
A few weeks ago, we started the process of developing task assignment models for Amara on Demand (AoD). We began by providing an FCFS prototype explained in another post, and now we would like to present the second iteration of this process: the Round Robin prototype.
This text is the continuation of Task assigment in Amara. Prototyping Round Robin with blockchain (I). We previously focused on presenting the technical specifications of this prototype, providing an overview of its components and how they are interconnected. We now explain how the new prototype is implemented and delve deeper into its new technologies and their integration.
The rigidity of the client
One of the most common problems we find when developing applications with Aragon is the potential rigidity of the client. This lack of flexibility limits the developer, who sometimes must find alternative ways to achieve the desired outcome. The Aragon client is a kind of dApp in charge of tasks like:
- Managing DAO applications and securely exposing them in the browser.
- Abstracting from the way wallet providers (Metamask, Frame, etc) are managed as well as from the creation, signature and execution of the transactions.
- Reinforcing the permission system by using the ACL to check all the actions performed by the user before executing them (withdrawal of funds, voting, minting tokens, etc).
- Managing application background tasks, such as script.js. This abstracts the developer from the capture and processing of events, making it possible to use the Aragon API module to access data from the events of the applications’ smart contracts.
As can be seen, the client offers multiple advantages by abstracting us from all kinds of tasks related to the management of our app. This and the absence of other alternatives make it difficult not to use this client. Therefore the developer must also accept the disadvantages that it entails.
The publication of Aragon Connect meant that there was now an alternative to the Aragon client and greater freedom when developing our frontend and in how we read and process the necessary data obtained from the blockchain for our app. This can be defined as a toolkit made up of a set of APIs that we can use via a web or node.js app to connect, in a simpler and faster way, with Aragon’s DAOs that are in the blockchain.
Aragon Connect has several of the features offered by the Aragon client and provides the developer with greater flexibility when creating new applications. There are two major advantages offered by Aragon Connect that justify its use:
- It allows us to create and develop new frontends for prototypes that follow our own style and design rules without having to be subordinate to the Aragon framework’s aragonDS design standard. There is no need to expose our applications within the Aragon client framework, and we can use alternative component libraries. In the case of this prototype, we decided to use Material-UI.
- It uses The Graph, a protocol that provides a more efficient process for indexing and querying data that allows us to make more granular and detailed enquiries to the blockchain. This is necessary in this prototype because it requires obtaining only the most recent events. This simple filter that we must apply to the events was not possible with the Aragon client, in which the events are scanned from the beginning of the contract.
However, the flexibility offered by Aragon Connect does involve some costs:
- Due to the absence of the client, we now have to take care of wallet provider management as well as the creation, signature and sending of transactions to smart contracts.
- Without the aragonAPI module, we must model and implement the state of the application manually, obtaining data through the connectors and integrating it properly so that it can be accessed from any of the frontend components.
- Although connectors made with Aragon Connect offer a more optimal and efficient way of indexing and consulting, their development involves a cost of effort and work that must be done before we can connect the frontend to the application contracts.
- The learning curve grows significantly as new technologies are mastered. We must learn how to assemble the structure of a connector and how to implement it. In addition, we must know The Graph protocol and the GraphQL language to be able to make queries to it.
The process of developing our prototype using Aragon Connect can be summarized in two major stages.
Integration with The Graph
As mentioned above, Aragon Connect uses The Graph protocol on the backend. The protocol offers a hosted service composed of a series of nodes in charge of processing Ethereum blocks by looking for events issued by the smart contracts and then mapping them to data that will be stored in the node’s database and that will be accessible to the dApps through a GraphQL endpoint. GraphQL is a query language for APIs that exposes the data stored in the server. You can find more information about the protocol here.
In order to tell The Graph node to start scanning the blockchain for data and events from the smart contracts of our prototype, we must create what is called a subgraph in the protocol. We can define it as a piece of software composed of several files that tell the protocol which smart contracts it must listen to, which entities to map them to and how to do it. It would be divided into three parts:
- The GraphQL scheme
- The mappings
- The subgraph.yaml file
Let’s start with the GraphQL schema of the prototype. We can understand this type of schema as the specification of the data structure to which the events coming from the contracts will be mapped. Below is the schema used:
type Config @entity {

 id: ID!

 maxAllocatedTasks: Int!

 appAddress: Bytes!

 orgAddress: Bytes!

}


type Task @entity {

 id: ID!

 endDate: BigInt!

 status: TaskStatus!

 statusInt: Int!

 reallocationTime: BigInt!

 assignee: User

 rejecterUsers: [UserRejectedTask]! @derivedFrom(field: "task")

 appAddress: Bytes!

 orgAddress: Bytes!

}


type User @entity {

 id: ID!

 benefits: BigInt!

 available: Boolean!

 rejectedTasks: [UserRejectedTask]! @derivedFrom(field: "user")

 appAddress: Bytes!

 orgAddress: Bytes!

}


type UserRejectedTask @entity {

 id: ID!

 user: User!

 task: Task!

}


enum TaskStatus {

 NonExistent

 Available

 Assigned

 Accepted

 Rejected

 Completed

}
As we can see, the schemas have a certain similarity to entity-relationship modeling. We define entities that are composed by typified fields. For the prototype Round Robin, we will have three main entities and a “relational” entity:
- Config: This entity contains all of the general parameters that make up our prototype. At the moment it only defines the maximum number of tasks that can be assigned to each user
- Task: The entity that specifies the tasks. We store data such as the final date of availability, the reassignment period, the status (for this field we use items listed below), etc.
- User: The entity that specifies the users. It stores data such as user availability, benefits obtained so far, etc.
- UserRejectedTask: This entity is necessary if we want to implement N-N relationships, as is the case of the relationship related to rejecting tasks: N tasks can be rejected by N users and vice versa.
Let’s move on to mappings now. Mappings are functions written in AssemblyScript, a more stringent subset of TypeScript used to compile WASM. They are responsible for transforming Ethereum contract events into GraphQL schema entities. For each event that we wish to index, we must define a mapping function. For example, the TaskRejected event of the prototype contract would have the following mapping:
export function handleTaskRejected(event: TaskRejectedEvent): void {

 const userRejectedTask = getUserRejectedTaskEntity(

   event.address,

   event.params.userId,

   event.params.taskId

 )

 const task = getTaskEntity(event.address, event.params.taskId)


 log.debug('TaskRejected event received. userId: {} taskId: {}', [

   event.params.userId.toString(),

   event.params.taskId.toString(),

 ])


 task.assignee = null

 task.status = STATUS_REJECTED

 task.statusInt = STATUS_REJECTED_NUM


 task.save()

 userRejectedTask.save()

}
As we can see, the mapping receives a TaskRejectedEvent and then searches for the UserTaskRejected relational entity and the Task entity using auxiliary functions that create a new entity if they do not find them. Once we have these entities, we remove the assignee field and assign the status TaskRejected. After this, we store both entities with the changes.
Mappings usually follow this process: a search is conducted for the entities in question, the relevant fields are modified and then the changes are saved.
The last component that makes up a subgraph would be the YAML file, template.yaml, which, due to its greater complexity, uses a template called subgraph.template.yaml for subgraphs made in the context of Aragon Connect. This template already includes other data required by any subgraph made for an Aragon app.
If we take a look at part of the YAML file from the Round Robin prototype, we can see how this type of file is configured:
...

schema:

 file: ./schema.graphql

...

templates:

...

 - kind: ethereum/contract

...

   source:

     abi: RoundRobinApp

   mapping:

...

     entities:

       - Config

       - Task

       - User

       - UserRejectedTask

...

     eventHandlers:

       - event: TaskCreated(indexed bytes32)

         handler: handleTaskCreated

       - event: TaskDeleted(indexed bytes32)

         handler: handleTaskDeleted

       - event: TaskAccepted(indexed bytes32,indexed bytes32)

         handler: handleTaskAccepted

       - event: TaskRejected(indexed bytes32,indexed bytes32)

         handler: handleTaskRejected

       - event: TaskAllocated(indexed bytes32,indexed bytes32,bytes32)

         handler: handleTaskAllocated

       - event: UserRegistered(indexed bytes32)

         handler: handleUserRegistered

       - event: UserDeleted(indexed bytes32)

         handler: handleUserDeleted

       - event: RejecterDeleted(indexed bytes32,indexed bytes32)

         handler: handleRejecterDeleted

     file: ./src/RoundRobinApp.ts

...
As we can see, this file constitutes the manifesto of the subgraph. Within this we indicate which schema or entities we will use, which contract we want to listen to and which mapping functions should be invoked according to which events are received. The last field tells the subgraph which file contains all the mapping functions.
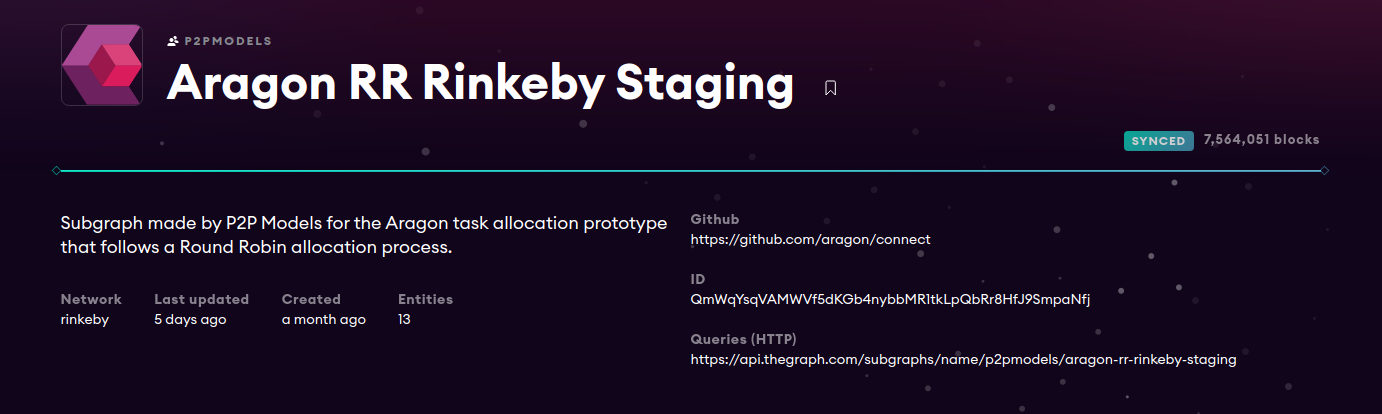
Once we have all this, we can use the prototype’s subgraph so that it is indexed by the protocol and starts processing Ethereum events. To do this, we first need to create it in The Graph’s subgraph browser, a web portal where we can access any of the subgraphs created so far. Once created, we can deploy the code. Next we can see the subgraph:
Creating the prototype connector
With the prototype subgraph displayed and running, now we just need a component that communicates with it and returns the data we try to query. This is where the connector comes in. This connector is structured as follows:
- models/: Here we find objects compatible with the Aragon Connect toolkit that we will return to the client. For the prototype we will need three models, one for each entity (Config, Task and User) that we defined in the GraphQL schema above and a model of the connector that will be used by the client to make the queries.
- thegraph/:
- parsers/: This subdirectory contains auxiliary functions that will parse the results of the GrahpQL queries, which will then transform those results into objects that have been defined in the model directory. The idea is to have a parser for each entity of the schema.
- queries/: All the GraphQL queries that the connector will make to the subgraph are stored here. One of the most important queries in the prototype is the following:
export const USER_TASKS_BY_STATUS = (type: string) => gql`

 ${type} Tasks($statuses: [Int]!, $userId: ID!, $first: Int!, $skip: Int!) {

   tasks(where: {

     statusInt_in: $statuses,

     assignee: $userId

   }, first: $first, skip: $skip) {

     id

     endDate

     reallocationTime

     status

     assignee {

       id

     }

   }

 }

`
- connector.ts: This is how the connector is implemented for The Graph. We can see the functions offered by the Round Robin connector through its interface:
export interface IRoundRobinConnector {

 disconnect(): Promise<void>

 onConfig(

   id: string,

   callback: SubscriptionCallback<Config>

 ): SubscriptionHandler

 user(appAddress: string, userId: string): Promise<User>

 onUser(

   appAddress: string,

   userId: string,

   callback: SubscriptionCallback<User>

 ): SubscriptionHandler

 tasksForUser(

   appAddress: string,

   userId: string,

   statuses: number[],

   first: number,

   skip: number

 ): Promise<Task[]>

 onTasksForUser(

   appAddress: string,

   userId: string,

   statuses: number[],

   first: number,

   skip: number,

   callback: SubscriptionCallback<Task[]>

 ): SubscriptionHandler

 rejectedTasksForUser(

   appAddress: string,

   userId: string

 ): Promise<Task[]>

 onRejectedTasksForUser(

   appAddress: string,

   userId: string,

   callback: SubscriptionCallback<Task[]>

 ): SubscriptionHandler

}
The connector offers methods for querying users and their tasks, including both available tasks and tasks that they have rejected. We can see that for each method the connector exposes a similar one that starts with the prefix on. These are methods that return a subscription, which is a special kind of operation in GraphQL that keeps an open connection with the server allowing the client to be notified in real time of any changes that occur in the server. These methods will not be useful for querying tasks from the client and keeping them updated at all times.
Normally, connector methods follow the following process:
- Get the id(s) of the GraphQL entities you want to query.
- The query that will be sent to the server is prepared using queries defined in the above-mentioned query directory.
- The result is parsed with a function from the parser directory.
- The result is returned.
As an example, we can observe the method that queries user tasks:
 async tasksForUser(

   appAddress: string,

   userId: string,

   statuses: number[],

   first: number,

   skip: number

 ): Promise<Task[]> {

   const id = buildUserEntityId(appAddress, userId)

   return this.#gql.performQueryWithParser(

     queries.USER_TASKS_BY_STATUS('query'),

     { statuses, userId: id, first, skip },

     (result: QueryResult) => parseTasks(result, this)

   )

 }
- connect.ts: This is the main file that exposes the function in charge of creating the connector. We make use of this function through the client and receive the defined connector.
With this we already have a fully functional, finished connector that we can start using on the frontend of the prototype to communicate with contracts on the blockchain.
Conclusion
Development with Aragon Connect is not easy and – as with the Aragon framework – the learning curve can be quite steep. Not only do we need to be familiar with the toolkit libraries, but also The Graph protocol and how subgraphs work. All of this involves multiple technologies that we must master individually and as a whole.
Although this may present difficulties, once we understand how to use each technology we can make use of the benefits they bring and develop dapps that are much more efficient and that incorporate the advantages of both Aragon and The Graph.
In the following and last article, we will take a look at the frontend of our prototype and what functionalities we have been able to implement thanks to Aragon Connect.
AUTHOR

The authorship is by Paulo J. Colombo, but this content has been made thanks to the whole P2P Models team ![]()
The designs are by Elena Martinez
The review by Genoveva López and Guerrilla Translation
Samer Hassan and Rosa Chamorro make everything possible


[…] to the connector explained in the previous article, we can now implement the functionalities of the Round Robin prototype, which we will expose using […]
Comments are closed.